Creating
and Maintaining a Travel Sketchbook
One of
the most rewarding parts of travel can be marrying it with the creative process
through a travel sketch book. Here are a
few tips on how to start and maintain a travel sketch book:
First,
consider your schedule and destination in considering your media, techniques
and equipment. All too seldom do
artistic travelers have the opportunity to linger upon a single subject as much
as they would like. Be sure to have a
small, light weight, digital camera (I find my IPad perfect for this) in order
to quickly document what you see first or on the fly, thereby creating a visual
reference file for yourself for use at a more convenient time.
Be
realistic about time and schedule a private sketch time for yourself everyday
when you can return to a subject or work from your photo references to finish
up a quick plien air start. Be realistic
too about the amount of time you can spend on a single work and keep your works
small and your media and techniques simple.
Save the large works and media experiments for your studio at home!
Find a
sturdy, easy to use container for your media that fits conveniently into what
ever tote you will be carrying
daily with you as you tour. I am quite
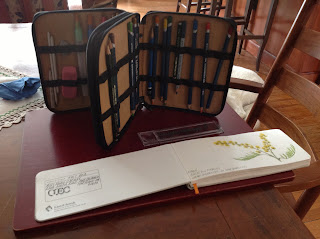
fond of the one pictured here. (Please note the six inch clear plastic ruler
in the picture for scale). It is compact, lightweight, and sturdy protecting
the contents from any impacts. It closes
securely with a zipper and has tight elastic to secure pencils and brushes.
I prefer
a hard bound sketchbook. I find that
spiral bindings can become bent and caught on things. The hard binding also provides a convenient
drawing surface. The paper I use is
usually for both wet and dry media.
The
sketchbook here was for my recent trip to Italy. You may note that it is a landscape
format. I purposely chose that as I knew
I wanted to do some landscape sketches.
Be sure to consider the proportions of your sketch book with regard to
your anticipated subject matter.
Be sure
to pack media that needs a minimum of space, creates a minimum of mess and
light weight equipment so you have maximum flexibility as to where and when you
can work (I love to finish drawings on the plane). Also, no one wants to lug an easel up and
down mountain sides or through crowded city streets unless you intend to stay
awhile or stay close by.
Staples my travel sketch kit
includes: permanent ink drawing pens (similar to the Micron brand) as well as a
small assortment of hard and soft leaded pencils. Don't forget the sharpener, kneaded eraser,
small ruler as well as a stump and tortillion or two for blending. Sometimes I like to bring conte pencils which
work well for landscape and architectural subjects. but, make sure your
sharpener can accommodate the larger conte barrel. Leave the pen knives and x acto knives at
home as airport security will confiscate them.
Another good addition are wash pencils which can be used as traditional
sketching pencils or you can add water and achieve a wash effect.
With
regards to wet media, I include several types in my kit. The first are watercolor pencils that behave
like normal colored pencils when dry and then can melt into soft washes with the addition of
water. I prefer the Derwent watercolor
colored pencils and like to use the watercolor brushes that have the hollow
handle as the water container for achieving the wash technique. I also carry a small, preloaded, plastic
folding palette for my traditional watercolors.
I do not bother with tubes as the per loaded, dry palette will have more
than enough paint for a two week trip.
For use with this palette, I carry three small brushes, two flats and
one detail.
And that
is really it. Here are a few examples of sketches created from the media kit
described above. Please note that I find
many of these mediums combine well.
The
sketch of the olives is a combination of pencil and watercolor:
This
sketch is a simple watercolor monochrome.
This
sketch combines watercolor and ink.
This
sketch began as a colored pencil sketch and then I added water.


